
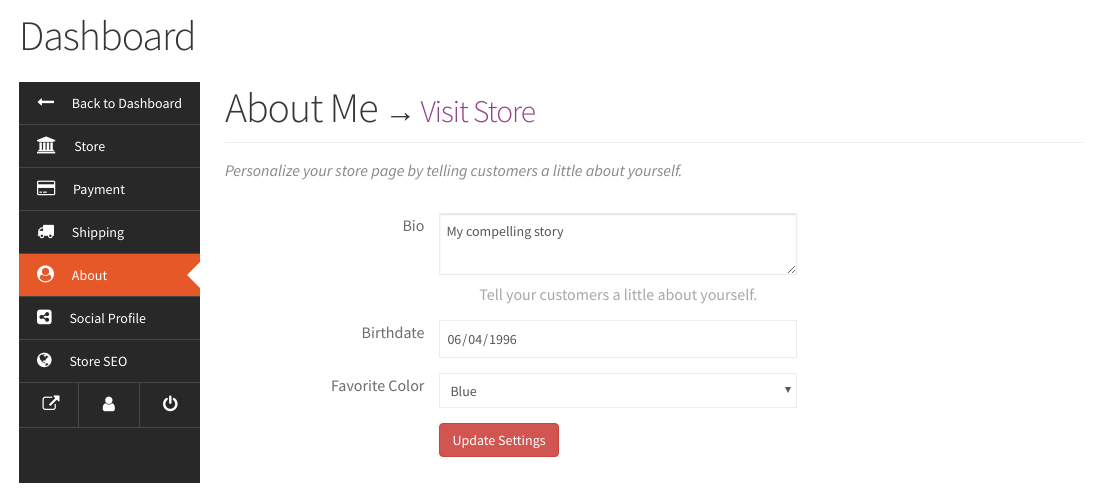
In this first part of our Extending Dokan series, I’ll be showing you how to add a custom settings tab to the Dokan vendor dashboard. To illustrate the basic concepts involved, I will be creating an “About” tab where vendors can enter some personal information about themselves. The end result will look like this:
I’ll admit that this isn’t the most practical example, but it should be enough to show you the basic workings of the Dokan settings API. That being said, let’s write some code!
Note: The code examples in this article use the generic vendor prefix “prefix_” for function and meta key names. In addition, text domains are omitted wherever internationalization functions are used. You should replace the generic vendor prefix with your own prefix and insert your text domain where appropriate when incorporating these code snippets into your plugin or theme.
Step 1: Adding our tab to the Dokan settings menu
The first thing we need to do is add a menu item for our settings page. To do so, we’ll use the dokan_get_dashboard_settings_nav filter.
Here’s what the code looks like:
/**
 * Adds an 'About' tab to the Dokan settings navigation menu.
 *
 * @param array $menu_items
 *
 * @return array
 */
function prefix_add_about_tab( $menu_items ) {
    $menu_items['about'] = [
        'title'      => __( 'About' ),
        'icon'       => '<i class="fa fa-user-circle"></i>',
        'url'        => dokan_get_navigation_url( 'settings/about' ),
        'pos'        => 90,
        'permission' => 'dokan_view_store_settings_menu',
    ];

    return $menu_items;
}
add_filter( 'dokan_get_dashboard_settings_nav', 'prefix_add_about_tab' );
As you can see, we get as input an associative array of menu items and return a modified array with our menu item inserted. Every menu item is itself an associative array with the following array keys:
| Key (* denotes required) | Description |
|---|---|
| title* | The label for the menu item, in our case “About”. |
| icon* | The icon to use for the menu item. You can insert your own icon or use one of the icons from FontAwesome 4.7.0. |
| url* | The URL to open when the menu item is clicked. |
| pos | This controls the order of the menu item in the settings menu. In this case I’ve set pos such that the menu item appears between Shipping and Social Profiles. You can omit this value, in which case the default value of 200 is used. |
| permission | The capability required to view the menu item. If omitted, all users can view the menu item. |
After this step, our settings page looks like this:
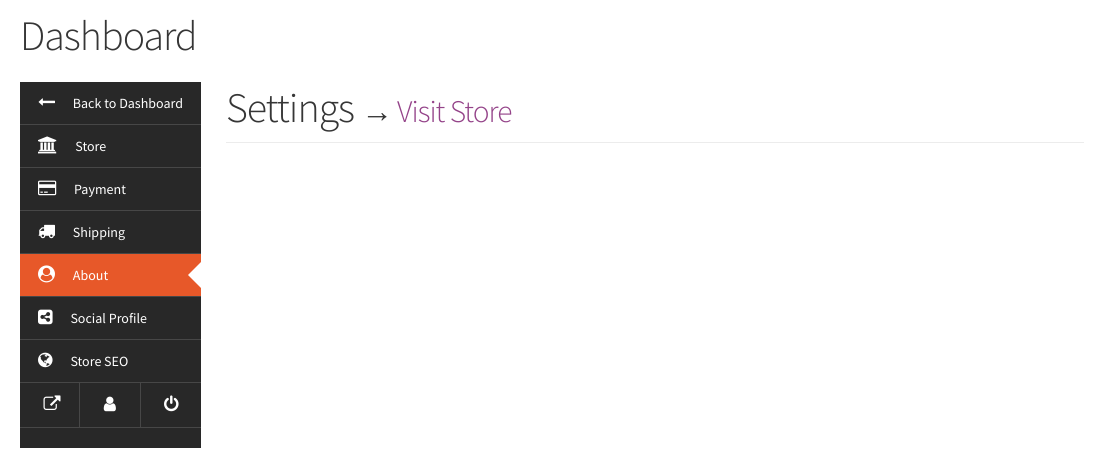
Step 2: Setting a custom title for our tab
We’re getting a little closer to our target, but we still have a ways to go. Let’s start by changing the title of our settings page to “About Me” and adding some help text to describe the page. To accomplish this, we’ll use the dokan_dashboard_settings_heading_title and dokan_dashboard_settings_helper_text filters, respectively.
Let’s take a look at the code:
/**
 * Sets the title for the 'About' settings tab.
 *
 * @param string $title
 * @param string $tab
 *
 * @return string Title for tab with slug $tab
 */
function prefix_set_about_tab_title( $title, $tab ) {
    if ( 'about' === $tab ) {
        $title = __( 'About Me' );
    }

    return $title;
}

add_filter( 'dokan_dashboard_settings_heading_title', 'prefix_set_about_tab_title', 10, 2 );

/**
 * Sets the help text for the 'About' settings tab.
 *
 * @param string $help_text
 * @param string $tab
 *
 * @return string Help text for tab with slug $tab
 */
function prefix_set_about_tab_help_text( $help_text, $tab ) {
    if ( 'about' === $tab ) {
        $help_text = __( 'Personalize your store page by telling customers a little about yourself.' );
    }

    return $help_text;
}

add_filter( 'dokan_dashboard_settings_helper_text', 'prefix_set_about_tab_help_text', 10, 2 );
Note: If you used an array key other than “about” when adding your menu item in Step 1, you will need to replace “about” with the key you used to make this snippet work.
As you can see, the heading_title and helper_text filters are almost identical. Each accepts the text to modify and a tab slug as arguments and returns the text to use for the given tab. In our case we target the “about” tab, setting the tab title to “About Me” and the tab text to “Personalize your store page by telling customers a little about yourself.”
After this step our settings page looks like this:

Step 3: Outputting the tab content
A settings page is useless without settings fields. At this point, we’ll write a bit of code to output the content for our settings page. The code uses the dokan_render_settings_content action hook and looks like this:
/**
 * Outputs the content for the 'About' settings tab.
 *
 * @param array $query_vars WP query vars
 */
function prefix_output_help_tab_content( $query_vars ) {
    if ( isset( $query_vars['settings'] ) && 'about' === $query_vars['settings'] ) {
        if ( ! current_user_can( 'dokan_view_store_settings_menu' ) ) {
            dokan_get_template_part ('global/dokan-error', '', [
                'deleted' => false,
                'message' => __( 'You have no permission to view this page', 'dokan-lite' )
            ] );
        } else {
            $user_id        = get_current_user_id();
            $bio            = get_user_meta( $user_id, 'prefix_bio', true );
            $birthdate      = get_user_meta( $user_id, 'prefix_birthdate', true );
            $favorite_color = get_user_meta( $user_id, 'prefix_favorite_color', true );

            ?>
            <form method="post" id="settings-form"  action="" class="dokan-form-horizontal">
                <?php wp_nonce_field( 'dokan_about_settings_nonce' ); ?>

                <div class="dokan-form-group">
                    <label class="dokan-w3 dokan-control-label" for="bio">
                        <?php esc_html_e( 'Bio' ); ?>
                    </label>
                    <div class="dokan-w5">
                        <textarea class="dokan-form-control" name="bio" id="bio" placeholder="<?php esc_attr_e( 'Tell your story' ); ?>"><?php echo esc_html( $bio ); ?></textarea>
                        <p class="help-block"><?php esc_html_e( 'Tell your customers a little about yourself.' ); ?></p>
                    </div>
                </div>

                <div class="dokan-form-group">
                    <label class="dokan-w3 dokan-control-label" for="birthdate">
                        <?php esc_html_e( 'Birthdate' ); ?>
                    </label>
                    <div class="dokan-w5">
                        <input class="dokan-form-control" type="date" name="birthdate" id="birthdate" value="<?php echo esc_attr( $birthdate ); ?>">
                    </div>
                </div>

                <div class="dokan-form-group">
                    <label class="dokan-w3 dokan-control-label" for="favorite_color">
                        <?php esc_html_e( 'Favorite Color' ); ?>
                    </label>
                    <div class="dokan-w5">
                        <select class="dokan-form-control" name="favorite_color" id="favorite_color">
                            <?php
                            $colors = [
                                ''       => __( 'Select a color' ),
                                'red'    => __( 'Red' ),
                                'orange' => __( 'Orange' ),
                                'yellow' => __( 'Yellow' ),
                                'green'  => __( 'Green' ),
                                'blue'   => __( 'Blue' ),
                                'other'  => __( 'Other' ),
                            ];

                            foreach ( $colors as $value => $label ) {
                                printf(
                                    '<option value="%s" %s>%s</option>',
                                    $value,
                                    selected( $value, $favorite_color, false ),
                                    $label
                                );
                            }
                            ?>
                        </select>
                    </div>
                </div>

                <div class="dokan-form-group">
                    <div class="dokan-w4 ajax_prev dokan-text-left" style="margin-left: 25%">
                        <input type="submit" name="dokan_update_about_settings" class="dokan-btn dokan-btn-danger dokan-btn-theme" value="<?php esc_attr_e( 'Update Settings' ); ?>">
                    </div>
                </div>
            </form>

            <style>
                #settings-form p.help-block {
                    margin-bottom: 0;
                }
            </style>
            <?php
        }
    }
}

add_action( 'dokan_render_settings_content', 'prefix_output_help_tab_content' );
Note: If you used an array key other than “about” when registering your menu item, you’ll have to replace “about” with your chosen key to make this snippet work.
Let me highlight some of the important parts of this code:
-
- The
prefix_output_help_tab_contentfunction accepts an array of WP query variables as input. On line 7, we check the value of the “settings” query variable to make sure that we’re only outputting our settings fields on the “About” page. - On line 8, we check whether the user has the capability required to view our settings page. If your settings page can be viewed by all vendors, you can eliminate this if statement.
- Line 20 is where we start outputting our form fields. In your plugin or theme, you should probably extract the form markup to a separate template file, but for this example I’ve kept it inline.
- Note that the ID of the form is set to
settings-form. If any other ID is used, our logic for saving and validating our settings fields won’t work.
- Note that the ID of the form is set to
- We output a nonce field on line 21. This will be important when we write our code for saving our settings fields in part 4.
- The
We’re almost there! Let’s wrap up by writing some code to validate and save our settings fields.
Step 4: Saving and validating our settings
All of our hard work would be for naught if vendors can’t actually save their settings. To finish up, we’ll write a simple function to validate and save the values entered by the vendor.
Here’s what the code looks like:
/**
 * Saves the settings on the 'About' tab.
 *
 * Hooked with priority 5 to run before WeDevs\Dokan\Dashboard\Templates::ajax_settings()
 */
function prefix_save_about_settings() {
    $user_id   = dokan_get_current_user_id();
    $post_data = wp_unslash( $_POST );
    $nonce     = isset( $post_data['_wpnonce'] ) ? $post_data['_wpnonce'] : '';

    // Bail if another settings tab is being saved
    if ( ! wp_verify_nonce( $nonce, 'dokan_about_settings_nonce' ) ) {
        return;
    }

    $bio            = sanitize_text_field( $post_data['bio'] );
    $birthdate      = sanitize_text_field( $post_data['birthdate'] );
    $favorite_color = sanitize_text_field( $post_data['favorite_color'] );

    // Require that the user is 18 years of age or older
    $eighteen_years_ago = strtotime( '-18 years 00:00:00' );

    if ( $birthdate && strtotime( $birthdate ) > $eighteen_years_ago ) {
        wp_send_json_error( __( 'You must be at least eighteen years old - is your birthdate correct?' ) );
    }

    update_user_meta( $user_id, 'prefix_bio', $bio );
    update_user_meta( $user_id, 'prefix_birthdate', $birthdate );
    update_user_meta( $user_id, 'prefix_favorite_color', $favorite_color );

    wp_send_json_success( array(
        'msg' => __( 'Your information has been saved successfully' ),
    ) );
}

add_action( 'wp_ajax_dokan_settings', 'prefix_save_about_settings', 5 );
This is essentially a simplified version of the WeDevs\Templates\Dashboard\Settings::ajax_settings() method that handles saving the default Store, Payment, and Social Profile settings built in to Dokan (view source).
The most interesting part of this code is the validation logic starting on line 21. When the birthdate entered by the vendor is less than 18 years ago, we use wp_send_json_error() to send back an error message. You should use the same approach when you detect an error in your validation logic.
I should note that in a real world application you should also be doing client side validation (Dokan uses jQuery Validate). I’ve omitted client side validation to keep this example simple.
Now the values entered by the vendor will be saved, and we’ll get a helpful error message when we select an invalid birthdate. Nice!

That’s it!
We now have a custom settings tab with basic validation. If you have any questions or suggestions, please feel free to leave a comment below!
The complete code for this tutorial can be found in this gist.
Updated: May 1, 2020
Tested With: Dokan Lite 3.0.3, Dokan Pro 3.0.1
Hi.
And if I want to add another menu with submenus how do I do it?
Dokan doesn’t provide an API for creating menu items with submenus. Until this use case is supported, you can either avoid the use of submenus (e.g. by outputting your own navigation menu within your settings tab), or override the global/dokan-nav.php template and replace dokan_dashboard_nav() with a custom function that allows menu items other than “support” to have submenus.
This is amazing, exactly what I was looking out for! I can’t wait to read future Extending Dokan articles by your team! I do have a question, I’m not super duper technical but what did you mean by the below? Could you please advise with an example? I tried to copy the codes you have provided into code snippets but it hasn’t worked yet!
Note: The code examples in this article use the generic vendor prefix “prefix_” for function and meta key names. In addition, text domains are omitted wherever internationalization functions are used. You should replace the generic vendor prefix with your own prefix and insert your text domain where appropriate when incorporating these code snippets into your plugin or theme.
Thanks so much!
Hi Vita,
I’m glad you found this article useful!
As you may have noticed, all of the functions in the provided code snippets have a name that starts with “prefix_”. The quoted text is suggesting that you replace this generic prefix with your own unique prefix. For instance, if your marketplace is called MyMarket, you might rename the
prefix_add_about_tabfunction from Step 1 tomymarket_add_about_tab. This is not strictly required but it’s advisable, especially if you plan to develop a plugin or theme for redistribution through WordPress.org or elsewhere. In your case it sounds like that isn’t your plan, so it’s not a huge deal if you skip this suggested step.Really great… Is there anyway to do for example….
Change the menu shipping link to another page?
Thanks
Hi Pau, sorry for the slow response. You could change the URL of the “Shipping” menu item using a code snippet like this. Just replace https://example.com with the desired URL.
/** * Changes the URL for the Shipping tab in the Dokan settings nav menu. * * @param array $menu_items * * @return array */ function change_dokan_shipping_settings_url( $menu_items ) { if ( isset( $menu_items['shipping'] ) ) { $menu_items['shipping']['url'] = 'https://example.com'; } return $menu_items; } add_filter( 'dokan_get_dashboard_settings_nav', 'change_dokan_shipping_settings_url' );Great stuff, thanks so much! Just one question. Does this code also write the code on the store-front page somewhere? If yes, on which line is this happening? I have a custom store-front and I would like to include the Bio-text in there. How should I approach this?
Thanks
Hi Wouter, this code won’t output the saved values anywhere on the frontend. One way to do that would be to register a custom store tab with some code like this:
/**
 * Adds an Example tab to the Dokan store page.
 *
 * @param array $tabs
 * @param integer $store_id
 *
 * @return array
 */
function add_example_store_tab( $tabs, $store_id ) {
    $tabs['example'] = array(
        'title' => __( 'Example', 'dokan' ),
        'url'   => dokan_get_store_url( $store_id ) . 'example',
    );

    return $tabs;
}

add_filter( 'dokan_store_tabs', 'add_example_store_tab', 10, 2 );

/**
 * Registers the query variable for our example page.
 *
 * @param array $query_vars
 *
 * @return array
 */
function register_example_store_tab_query_var( $query_vars ) {
    $query_vars[] = 'example';

    return $query_vars;
}

add_filter( 'dokan_query_var_filter', 'register_example_store_tab_query_var' );

/**
 * Adds a rewrite rule for our Example store page.
 *
 * @param array $rewrite_rules
 *
 * @return array
 */
function add_example_tab_rewrite_rules( $rewrite_rules ) {
    add_rewrite_rule( $custom_store_url . '/([^/]+)/example?$', 'index.php?' . $custom_store_url . '=$matches[1]&example=true', 'top' );
}

add_action( 'dokan_rewrite_rules_loaded', 'add_example_tab_rewrite_rules' );

/**
 * Loads the template for the Example tab.
 *
 * @param string $template
 *
 * @return string
 */
function load_example_tab_template( $template ) {
    if ( get_query_var( 'example' ) ) {
        return dokan_locate_template( 'store-example.php', '', DOKAN_PRO_DIR. '/templates/', true );
    }

    return $template;
}

add_filter( 'template_include', 'load_example_tab_template' );
You’d then have to create a template called store-example.php in the directory/dokan/ to output the saved values. You can start by copying the store-toc.php template from Dokan core.
Let me know if you have any questions!
Hello Adarsh!
This code show a tab in store tabs but link not working.
It redirect to page not found.
Hi,
Try flushing your permalinks by navigating to the Settings > Permalinks screen in WP admin and clicking the Save changes button.
Very well explained !!
Thanks Adarsh!
I am trying to run the example code, the form is rendered etc, but when I save the form all of the dokan shop data are lost, any ideas?
Hi Constantinos ,
I haven’t tested this code in quite a while. It’s possible that something in a subsequent Dokan Lite or Dokan Pro update broke the part of the code that saves the settings values. I will try to revisit this tutorial and update as needed this weekend.
– Brett
I’ve updated the code to fix this issue. Thanks for reporting it!
I have tested this code but still it’s not working. When i tried to integrate this code all the functionality works but i lost all information of my shop after save.
Hi,
I just tested the latest version of the code with Dokan 3.0.9 and Dokan Pro 3.0.3 and I’m unable to reproduce this issue. Maybe you’re using a different version of Dokan? Let me know and I’ll gladly try to reproduce and fix the problem again.
Hey, thanks for checking this article out. Most likely a recent Dokan Pro or Dokan Lite update broke this code (again…). I’ll investigate this weekend and update as needed.
I am a total newbie and use dokan-lite. I can copy and paste into a php file and transfer it via ftp. I can also tweak an ftp, if given proper instructions. the silly question is – where do I have to use these codes? Step 1, 2, 3 and 4 and also the front end explanation in the comments. This is the simplest and the neatest way to do it which I have come across browsing for the last few months. BTW I just need to create an About us section in the backend and an about us tab in the front end store. It can be done by your code – just that how to do it?
Hey Vasudev,
For this code to work, you would just need to place it into your theme’s functions.php file. Also, if you don’t have a child theme yet, we’d highly suggest setting that up prior to adding any code. That way theme updates won’t overwrite your modifications.
Thanks
Hello. Very informative read. Does this code still work with the latest dokan lite and wordpress. Thanks
Hey John,
Thanks for the question! I just did a quick test with Dokan 3.6.4, and all seems to be working as intended!
Thanks
Chris